Wednesday, November 19, 2014

Using Quizlet to "Make It Stick" and Other Random Ideas

I have been reading the book Make It Stick and have come away with SO many ideas. I highly recommend the book.  There are also some shorter ways to connect to the content here

I love this quote from the book "Learning is deeper and more durable when it is effortful. Learning that's easy is like writing in the sand, here today and gone tomorrow" (pg. 11). I think this is one to the key misunderstandings about learning.  By making mistakes and then correcting them we strengthen our learning. As teachers there are ways we can use the information presented in this book to help our students become better learners and to deepen their learning.

Testing is a learning tool and according to cognitive science research practicing retrieval is key.  Practicing should be spaced, varied and interleaved to to be most powerful. So using quizzing before a lesson, after a lesson and students creating their own quizzes should we used more often.  To that end, I reconnected to Quizlet. There is even an apple and android app.  Below is the set of flash cards I created to help me learn the concepts in Make It Stick.  I will continue to add to this.


Now for just some random ideas and examples of things I would like to incorporate into my teaching.

  1. Write down 10 facts you didn't know before reading the chapter. I was thinking about adapting this and asking participants in a webinar to write down 3 things they did not know before the webinar.
  2. Retrieval practice that involves short answers and essay is more effective for long-term learning than multiple choice and true/false.
  3. Practicing via flashcards is super powerful.  I would like to develop flashcards and provide a link to the set for participants to use after a training session.
  4. Mixing up the practice is important. Provide some space between practice sessions, interleave practice sessions with different content. Important to note that this will feel more effortful but will actually produce better learning.  Also interesting is that even presented with this information will tend toward mass practice and rereading as ways of studying.  I love this quote "Practice like you play and you will play like you practice" (p 52).
  5. Reflection involves both retrieval practice and elaboration. A good practice is to take a few moments after an experience to ask yourself a few questions: what went well, what would I do differently, what does this experience remind me of,
  6. Embracing difficulty is a key to learning.  I love the idea of generation, being asked to supply an answer or a solution to something that is new to you. Give students some problems to solve before coming to class.
  7. Explain a concept in your own words.
  8. After a mini lecture, ask the class a few questions, but ask them not to refer to their notes.  This way they need to think harder about the answer and thus strengthening the pathway to that new knowledge.
  9. Repeated retrieval is important to long term memory.
  10. Listen to an audio recording and explain one key take away in your own words. Could be shared in a small group.
  11. After listening to a recording, present students with some conceptual questions to talk about in small groups.
  12. Reflecting on one's own learning and making it into a story strengthens learning.  This could be related to the role that structure building has in learning.
  13. The focus of dynamic testing is identify what areas you need to strengthen, refocus and then retest.
  14. The most powerful learning happens when wrestling to solve a problem.
  15. Elaboration involves finding additional layers of meaning in new material. Examples of this are in the use of metaphor and creating a visual image. In essence you are relating new material to something you already know, explaining it to someone else and describing how it relates to your life.

Saturday, October 18, 2014

Adobe Connect 9.3 Whiteboard Tool - The Basics and Ideas for Use

On October 17, 2014 the TLT Group FridayLive webinar focused on "What's New in Adobe Connect 9.3." One of the tools featured was the whiteboard.  Below are some of the highlights from that session. This short video describes the basic whiteboard features and introduces a whiteboard activity.


Some of the ideas shared during the session on ways the whiteboard could be used.

  1. The white board could be overlayed on a video and the annotation tools used to highlight key points.
  2. You can ask students to place an X on a line to illustrate their experience or comfort level with something you are about to introduce.
  3. As an ice breaker you could put up a wall image and invite participants to create graffiti before the start of a live session.
  4. The whiteboard can also be an overlay on applications such as Access, Excel, etc.
  5. Use the whiteboard for a chalk talk activity and then export it as notes for the participants.
  6. Use for brainstorming activities.
  7. Use it for exporting notes for student review.
  8. Develop a slide deck loaded with images of walls, maps, squares, etc.that can be used on the fly for the whiteboard.
  9. Use animated gif's on the whiteboard.
Whiteboards can be printed.  There are also two ways to export whiteboards: they can be saved as png or sent as a snapshot.

It is always valuable to be logged in as a participant so you can see how the screen appears to the participant. Another great piece of advice, spend time practicing with the setting and learning new techniques.

Next steps:
  1. I plan to continue to add to the list of ways the whiteboard can be used in Adobe Connect.
  2. I plan to test the whiteboard feature in breakout rooms

Wednesday, October 15, 2014

My VoiceThread Learning Journey Continues

I am continuing my VoiceThread learning journey using Michelle Pacansky-Brock's book and am loving the discussions taking place about the book using VoiceThread.


I created a survey using VoiceThread and the Doodle tool, see below.  I gave people the option to use VoiceThread or a standard survey. Most people chose the standard survey.


Some take aways from Chapter 2:

  • For VoiceThread activities, it's important to provide instructions that are: clear, specific, and accessible, I think it works best to have the instructions in writing on the screen in addition to providing them verbally.
  • I would like to use Tackk to create a web page when designing a larger project. A VoiceThread could be embedded where participants could ask questions about the project.  Include sample projects and chunk the project into steps with dates and specific deliverables.  This approach could be used for TOL4B.
  • I also like Michelle's suggestion of scaffolding the use of VoiceThread in a course by first having student leave comments, then move to editing and commenting and finally creating their own VoiceThreads.
In Chapter 3 Michelle provided examples of 8 different slide types. I like the idea of creating a consistent look and feel to the design of VoiceThreads that are used in a class. I also liked how Michelle added little reminders like "Comment Here" and "Just Listen.". I also like the way Michelle uses the check-in slide.


In Chapter 4 I gained a better understanding about why Michelle had so many different feedback identities. You need to use different identities if leaving multiple feedback in the same VoiceThread so you can reorder the feedback next to the comment being made.  Michelle also shared that she turns off the comments after the week assignment concludes.  Students still have access to view the ViceThreads and have reported value in doing so,

Sunday, October 05, 2014

What I am learning about VoiceThread

How to Humanize Your Online Class with Voicethread by Michelle Pacansky-Brock
I am participating in a TLT Group book discussion around Michelle Pacansky-Brock's book, "How to Humanize Your Online Class with VoiceThread. The discussion is taking place using VoiceThread.

Here are some of my take-aways from Chapter 1:

  1. Create different identities such as one for when I am when I am inserting a text transcript of my voice comment and one for when I am providing feedback.
       
  2. Survey students at the beginning of class regarding the the method they plan to use for creating a voice comment: mic, webcam, mobile app, phone.
  3. A low risk ice breaker at the beginning of class which requires the use of voice.
  4. It looks like there is a way to use the Doodle tool so that it does not fade away.  I want to experiment with that.
  5. I'd also like to experiment with uploading a video into VoiceThread and using the Doodle Tool to comment.
  6. I'd like to experiment more with leaving VoiceThread comments using a mobile device. 
Here are some things I want to further explore or questions that were raised for me from Chapter 1:
  1. I would like to better understand Voice Manager.
  2. I would like to create/adapt some collaborate learning activities using VoiceThread with some of my content.
  3. I would like to further explore the various ways we, as teachers, can and should construct our presence online.  
  4. Instead of using a survey regarding the up-coming TLT Cognitive Science Book Discussion Series, I would like to create a VoiceThread as a way for members to react to the books and talk about how they may want to contribute to the discussions.

Tuesday, April 15, 2014

Presentain Experiment #2

Thanks Penny Kuckkahn (@pkuckkahn) for your feedback and participation as the audience for Experiment #2!!!! Here is what we discovered:

  1. The recording audio worked GREAT. Switching to the "Rotate remote" option setting on the app did the trick.The audience question feature worked. I also like the slight vibration when a question comes in and then being able to display the question at the most appropriate time. The vibration does result in a light sound on the recording.
  2. One thing that did not work as I anticipated, I displayed a poll which resulted in some conversation. This is probably atypical, but my audience did not respond and I think that may be why the poll did not show up on the recording.
  3. I like the dashboard results especially the poll results. It might be nice to be able to export this information.

Below is the experiment recording


DRAFT WORK FLOW

  1. Design presentation: outcome, assessment, activities, slides, polls, etc
  2. Upload presentation slides into Presentain: pdf or Google slides (It takes time for this process, longer for longer presentations.)
  3. Select presentation on your handheld device.  This too takes a few minutes to launch.
  4. Bring up presentation on Presentain website and enter presentation pin number displayed on handheld device
  5. Start presentation from handheld device, when ready.
  6. Show audience website URL for their access to the presentation.
  7. Your handheld device now becomes a remote control to advance the slides, receive audience questions, select poll questions, and record your audio.
  8. The audience can down load select slides, ask questions, answer polls, request additional follow-up information.
Join us for Experiment #3, Friday, April 25, 2014, 1:30 PM ET tlt.gs/login


Saturday, April 12, 2014

Experimenting with Presentain

I was first introduced to Presentain through a post from Michelle Pacansky-Brock. She shared her first experience using Presentain and used it as an example of vulnerability while presenting "Teaching in the Dark: Learning to Love What We Fear." Thanks Michelle.

This led me to my own experiment with Presentain during a pre TLT Group FridayLive event. Presentain is designed to help manage face to face presentations. The setting for this experiment was a little unique in that it took place using Adobe Connect, with participants in various places throughout the US, so not your typical presentation setting.

A big thank you to the my fellow TLT Experimenters and to Neek Kuat from Presentain for his quick response to my post experiment questions.  Here is what we discovered so far:

  • AUDIO on the RECORDING. One of the cool things about Presentain is that a recording is created. In my experiment, the audio did not turn out. I had my phone sitting on the table next to me with the mic against the table. According to Neek "Best way to record the "slidecast" (presentation recording) is to switch on "Rotate remote" option in settings of the app (on your smart device) - this will allow you to turn your smartphone upside down when presenting - and hold it in your hand during presentation." The mic quality of your smartphone will impact the result as well.
  • POLL RESULTS.   Poll results are designed to be displayed only on the main screen not on the handheld.  Neek's response: "Good point on poll results - will consider showing results on audience devices when making a next batch of updates to audience dashboard.
  • AUDIENCE QUESTIONS. I should have been given a signal on my smartphone when a question from the audience came in.  I did not. This should have worked so, I will do some more testinDg as I really like this feature.  In theory, I should see a prompt on my smartphone and can then chose to display the question on the screen and address it live.  The questions also appear in a session summary so I could address them afterward as well. Response from Neek: "You are absolutely right about the incoming question notification. Originally we wanted to notify the speaker about incoming question with a short vibration of the smartphone, but technically it is not possible yet since Apple doesn't allow to use vibration feature while using microphone (I think they are trying to avoid noises in the phone calls or when recording an audio).
  • DASHBOARD: The other cool thing about this app is the information available to you after the presentation, see diagram below: slide requests, lead captures and poll results.


One of the experimenters wondered if Presentain would replace clickers. In essence, the smart device does become an audience response device. I think answering a Presentain poll is more seamless than Poll Everywhere. The audience does need to go to the website to access the presentation on their smart device.  Once at that website, they can see the slides, ask a question and answer polls.

Someone asked how similar or different this was from NearPod. I have zero experience with Nearpod but did discover that it is an iPad app, similar to Presentain with a few more bells and whistles for in class instruction.

My next step is to run the experiment again to check the recording audio and the audience question feature. I will also write up the steps for setting up the presentation.


Sunday, March 30, 2014

Experimenting with Game Boards in Adobe Connect

"Games can be used to test prior knowledge when introducing a topic or they can be used to test understanding", (p. 25, Dailey (2011). Robins (2010) explains that games are a good way to learn for these reasons:
  • they involve intrinsic and extrinsic motivators, 
  • have clear measures of success and feedback
  • have reduced stakes
  • help student translate various skills, concepts and ideas;
  • involve both collaboration and competition
  • usually include a tutorial or clear instructions for play; and 
  • facilitate reflective thinking
This experiment involved taking a game board activity and adapting it to Adobe Connect.  Every webinar has unique functionality.  In Adobe Connect only presenters can use whiteboard tools, so volunteers are needed and their status changed to presenter for the duration of the game. I hope this recipe will help you give it a try.  It was a fun and engaging experiment.  I very much appreciate those who volunteered to help. I had a much smaller group than anticipated and plan to try it again with a larger group to see how it goes.

INGREDIENTS
  1. Game Board. There are a variety of free templates for developing question cards and game boards.  This link will take you to a very simple PowerPoint game board. You can customize the game board by adding images to the board relevant to the topic.   Below is an image of the Adobe Connect layout.
  2. A Set of Multiple Choice Questions. The site above also has a template for making question cards which could be use in a face to face setting.  I used PowerPoint to create a slide for each question with the answer animated to appear with a click.
  3. Tokens. There a few symbol choices available using the whiteboard tools in AC.  I created two symbols and filled them in with a different color.
  4. Die. I used a digital die from this site, http://www.random.org/dice.  I rolled the die off camera and told them the result.  It would have great to roll the die within Adobe.
DIRECTIONS
  • In preparation for the game, the questions need to be developed and the PowerPoint or card set created. In addition the game bard can be customized.
  • Obtain two volunteers willing to move the token for each team.  Change their status to presenter.  Participants are not able to use whiteboard drawing tools. I then gave the volunteers directions on how to move the token using the select drawing tool. 

                   
  • The selected token will then appear as below and they can then click and drag the token
    throughout the game board.  Give the volunteers a chance to practice.


  • I divided the participants into two groups based on their last name and reviewed the following directions which were on a ppt slide

  • I revealed the question and then allowed anyone on the team to answer.  If they all have mic access this could take place orally if not, then the answers could be shared in the chat pod.  If the team did not have the correct answer, I allowed the other team an opportunity to answer.
  • Below is the Adobe Connect room layout during the game.


REFERENCES
Dailey, B.A.M. 2001. Creating Significant Deep Learning Experiences: The Cross Papers Number 14. Phoenix, AZ: League for Innovation in the Community College.
Robins, S.S., Eisert, D. and Kelton, A.J. (2010, October 14). Games: The Best Way to Learn, Period. Retrieved from Educause http://www.educause.edu/annual-conference/2010/games-best-way-learn-period

Saturday, March 15, 2014

Creating Documents for Screen Readers: Beginning My Learning Journey

This is just the beginning of my journey into the world of screen readers and creating documents.  I will add more as I continue down the road.

Lesson #1: Screen Readers and Tables
This first lesson I attribute to Nicki Ugalde. There is allot more to learn but here is one of my first small steps. Below is a message I created with Movenote and sent to Dee Fink as my learning took place in preparation for his March 14, 2014 TLT FridayLive presentation.
The main lesson I learned was to be sure the table headings are inside the table unlike the document you see below.  A screen reader will not interpret "Week/Module 1" as a heading the way it is set up. This link will also take you to the Movenote.

Tuesday, January 28, 2014

My App Smashing Journey


Penny Kuckkahn introduced me to app smashing. The term "app smashing" was coined by Greg Kuloweic and Lisa Johnson. The phrase refers to the process of using more than one app to complete a project. Penny and I decided to create an app smashing recipe for using story as an instructional activity or strategy adaptable in a mobile learning environment.

My first step is to broaden my skills in using a variety of mobile apps. I started with Tellagami, an app used to created a quick animated message. Below is my first creation.


The next app I explored was Pic Collage. This app helps you combine photos, stickers, text and frames to create a collage that can be easily shared. My first collage.


Saturday, January 25, 2014

Storify - to Form or Tell Stories Using Social Media

I experimented today with Storify. Storify is a social network service that lets the user create stories or timelines using social media such as TwitterFacebook and Instagram The website got its current name from the obsolete, former dictionary word: storify. Storify means "to form or tell stories". Users search through multiple social networks from one place, and then drag individual elements into stories. Users can re-order the elements and also add text to help give context to the readers.(http://en.wikipedia.org/wiki/Storify)

I'm interested in story as an instructional strategy and this is a tool that could easily be used by students to create a story around the content they are learning. 

Below is a story I created around the 7 Futures of American Education schMOOC. 

Great resource http://cybraryman.com/digitalstory.html

Thursday, January 23, 2014

Animations and Gadgets Oh My

Two new things I have been trying this week.  Powtoons and Twitter Gadget for Google sites.

POWTOON

I have been wanting to try out one of the animated applications so decided to create the 7 Futures schMOOC week 1 learning plan using one of the apps. First I tried GoAnimate. I just wanted to use the free version.  I got half way through the development and was prompted to purchase one moth for $39. I wish I would have known that what I was doing was beyond free BEFORE I spent time. The App Guys recommended Powtoons so off I went to learn Powtoons.  Below is my first attempt. The tutoirals were very good.  I decided to use one of the templates and modify from there.  That seemed to work pretty well and helped me further learn the app.I am excited to delve a little deeper.


EMBED A TWITTER GADGET IN A GOOGLE SITE

This was much trickier that just choosing the gadget. There was a Twitter Gadget but it didn't work. This link takes you to the article that saved the day. The YouTube video was great. Embedding the Twitter feed involved what is called adding the gadget by URL.  There were some tricky steps to the process that were made clear in these instructions.  You can see the final result by clicking here.

Saturday, December 14, 2013

Adapting Ordered Sharing for Adobe Connect Breakout Rooms

TLT FridayLive participants shared their thoughts on the Fundamental Questions related to using ”breakout rooms” in online sessions.
What do you most what to gain:
  • providing the shy / quiet folks with a smaller group to talk
  • less pressure to speak in front of everyone else
  • brainstorming and planning for sharing back
  • Giving folks the opportunity to contribute in small groups when they don't feel comfortable sharing in large groups
What do you most cherish and not want to lose:
  • still allow the kind of dialogue that emerges in f2f small groups
  • communication and relationship...  
  • Ability for students to feel connection and responsibility for their ideas and contributions to a community understanding - weaving back into larger class/group.

Breakout rooms offer an opportunity for dialogue. “Through critical discourse, students convert surface knowledge to deep learning by connecting new ideas to their existing framework, creating new patterns, dissecting principles, and ultimately constructing meaning for themselves” (Dailey, 2011, p.21).  Helping students learn at a deeper level is well worth the effort. Ordered Sharing, offered by Caine Learning Center,  is one instructional strategy that can be used to that end. Below are the some ideas for adapting this strategy to an Adobe Breakout Room environment.


First we applied the lessons we learned in using Adobe Breakout rooms in general, see this blog post for more information. Three key elements for success are:

  1. Allow more time than you think for the activity.  
  2. Practice makes Progress, each web-conference platform is different and has it’s own operational nuances.
  3. Verbal and Written Instructions; review prior and have visible in the breakout room.
stippled-photo-53901134
Image created in Stipple
PREPARATION

  1. Identify a participant who will serve as the group’s time keeper. Make them a presenter before starting the breakout rooms.
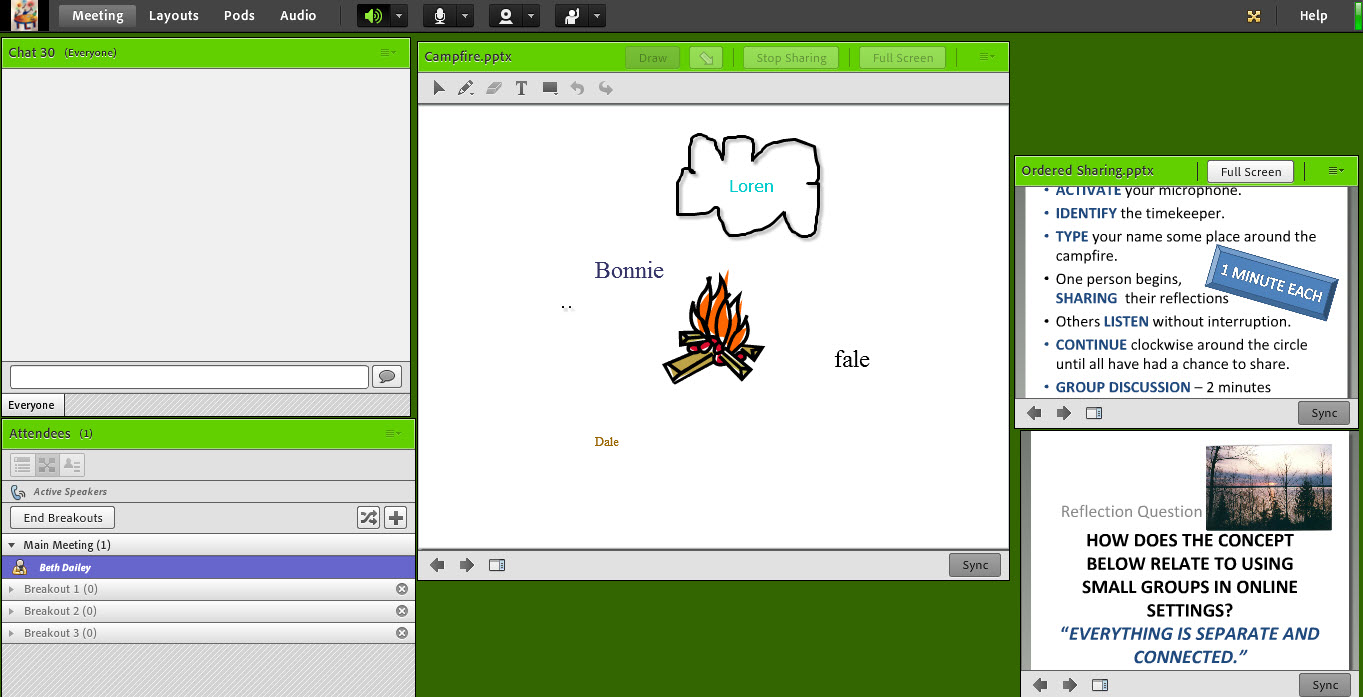
  2. Set up the breakout room layout. In the layout below, a campfire image was uploaded into a share pod. Directions were created in PowerPoint and uploaded into another share pod and the reflection question was upload into a third share pod.

Ordered Sharing Breakout Room Layout
PARTICIPANT ORIENTATION
  1. Introduce the slide drawing tools and allow participants time to practice.  This could be done as an icebreaker at the start of the session.
  2. Introduce the topic.
  3. Review the directions: visual and verbal. Explain the reason the ordered sharing activity is being used. Ordered sharing is another way to listen and think together through dialogue. Encourage participants to listen fully without commenting in any way, observing their thoughts and the thoughts of the group, suspending their assumptions, refraining from imposing their views on others, and avoiding suppressing or holding back their thoughts.
  4. Give participants an opportunity to reflect.
  5. Change to the breakout room layout and explain that this is the layout they will see in the breakout room. Review directions including how to activate their microphone in the breakout room. Explain that the campfire image provides the context, a setting for the group to talk together. Identify the time keepers.
  6. Evenly distribute participants into rooms or manually move participants.
  7. Provide a warning that they will soon find themselves in a breakout room. Start breakout sessions.  
DURING THE ACTIVITY
Check in on the groups and assist with any technical challenges. Based on progress, determine when to close the breakout rooms.  Give the groups a 2 minute warning, 1 minute warning and then announce that they will be returning to the main room.


WRAP UP
You might decide to ask the groups to report out in some way and or to debrief the Ordered Sharing strategy.

Resources:
Caine, R. N., Caine, G., Kimek, K. J., McClintic, C. L., & Costa, A. L. (2009). 12 brain/
bind learning principles in action. Newbury Park, CA: Sage Publications.


Dailey, B.A.M. 2001. Creating Significant Deep Learning Experiences: The Cross Papers Number 14. Phoenix, AZ: League for Innovation in the Community College.

Friday, December 06, 2013

"To MOOC or Not to MOOC? Is that the question?" Implications for successful experienced faculty

The TLT Group will talk about MOOC today, Friday, 12/6/13, 2:00 PM ET. Register Here for this free event.

This article "MPPCs for PD: Will massive open online education revolutionalize professional development?" talks about MOOCs for teacher professional development.  The TLT has offered two MOOCs for higher education faculty and will be offering two more next year

  • Seven Futures of Education schMOOC, Jan 14 - February 22, 2014 Register Here
    You can join in the planning of this MOOC, Dec 10 and 17 (4:00 PM ET) tlt.gs/membersonline
  • Teaching Online for Beginners, Spring dates TBD


MOOCs
Source: BestCollegesOnline.org

Wednesday, December 04, 2013

Experimenting with Stipple

I have been experimenting with Stipple. Ilene Frank connected me with this resource as a way to cite photos.  It has many other uses as well.  In the example below, I created a Stipple to promote an new TLT event, "Seven Futures of American Education schMOOC." Please let me know what you think of the Stipple I created and with Stipple in general.

This link will take you to the Stipple site (http://stipple.com/photos/53833588)


stippled-photo-53833588

Saturday, November 16, 2013

Applying lessons from connectivist MOOCs and Udacity to TOL4B

"MOOC - The Resurgence of Community in Online Learning," by Stephen Downes, got me thinking about MOOC is relation to the TLT Teaching Online for Beginners (TOL4B) MOOCOW that just concluded.  The "OW" by the way, stands for "or whatever." 

http://halfanhour.blogspot.com/2013/05/mooc-resurgence-of-community-in-online.html?m=1    Below are some ideas I want to apply to TOL4B version 2. 


I take a performance based approach to instructional design and tried to apply Dee Fink's
Made with Paper 53
integrated course design approach to the design of TOL4B. In some respects this seems to be contrary to the connectivist theory which is the foundation of the MOOC.  I read Creating the Connectivist Course" in Stephen Downes collection "Connectivism and Connective Knowledge: Essays on meaning and learning networks " (May 20120)
http://www.downes.ca/files/Connective_Knowledge-19May2012.pdf
 trying to understand what type of design approach Stephen Downes used in the  MOOCs he has offered.  


"By navigating the content environment, and selecting content that is relevant to your own personal preferences and context, you are creating an individual view or perspective. So you are first creating connections between contents with each other and with your own background and experience. And working with content in a connectivist course does not involve learning or remembering the content. Rather, it is to engage in a process of creation and sharing. Each person in the course, speaking from his or her unique perspective, participates in a conversation that brings these perspectives together." (pg 505)

So far I have not been able to find an answer to my question.  My sense is that a primary purpose of these early MOOCs was to create connectivist experiences and environments. There are people who suggest that connectivism is not a theory, I tend to agree.  I think it's a way of facilitating learning and designing learning environments which focuses on networking within communities of learners.

I was also fascinated by a recent article in Fast Company, "UDACITY'S SEBASTIAN THRUN, GODFATHER OF FREE ONLINE EDUCATION, CHANGES COURSE,"

  http://www.fastcompany.com/3021473/udacity-sebastian-thrun-uphill-climb Apparently Sebastian Thrun is not happy with the low completion rates in Udacity courses and is partnering with businesses and colleges to use the content within the framework of a course or an organization. This model will also produce revenue for the company. Udacity courses are still available for free but if you want credit or a mentor there is a cost.  Sounds like a realistic model to me.
"Udacity’s mission is to educate people so they can live a better life. In an era of declining employment opportunities in many traditional areas, we are empowering our students to acquire the necessary skills to excel in the high-growth tech industry."


The TOL4B offered 3 paths through the MOOC: guided, DYI supported and DYI unsupported. Sounds similar to the shift Udacity has made.

More thinking to do,

Saturday, November 02, 2013

TLT TOL4B MOOCOW Midcourse Feedback

I have been experimenting with Haiku Deck. Below is my first attempt. I created it using my iPad.  I was also able to add notes to each slide but I don't see them in this embedded version. I do see the notes when viewing the web version   

I don't see how to easily add audio.  You can export to PowerPoint and then use Screencast-O-Matic to add audio.

I like how easily you can add images from Creative Commons. You can also add your own images but I found that to be more challenging.

The feedback was gathered using a free assessment survey tool, TooFast,


Created with Haiku Deck, the free presentation app for iPad

Saturday, October 26, 2013

USING ADOBE CONNECT BREAKOUT ROOMS – LESSONS LEARNED

This is a collection of the lessons I recently learned when preparing to use Adobe Connect breakout rooms in preparation for a small group activity which was part of the TLT MOOCOW, Teaching Online for Beginners, tlt.gs/TOL4B (10/18/13)

Three very general pieces of advice. One, give yourself lots of time for group work. Two, practice several times before using this feature. Three, take time to clarify instructions at the onset: verbal and visual.

Preparation Strategies We used breakout room facilitators.  We met several times:
·         Went over the small group activity, directions and various individual group member roles.
·         Practiced moving from the main room layout to the small group layout.
·         Work with the facilitators so they also know how to send the host a chat message while within the breakout session. 

NOTE: The best way to get the facilitators into groups is for them to be presenters before moving breakout groups. Adobe will distribute each to a different breakout room.

Participant Orientation to New Features/Functions  Include some practice activities and or demonstrations  using features that may be new to participants such as writing on the Note Pod and activating microphones. Participants become presenters when moved into breakout groups.  This gives them the ability to use the microphone.  You may also want to develop and review guidelines for regulating conversation especially if the group is large and if many have mics such as raising your hand when you want to speak.

Activity Directions and Breakout Room Functionality    Review activity directions with the large group in addition to including a slide with those same directions which will display in the breakout rooms.  Explain how the groups were formed, random or selected.  Random is the easiest and fastest way especially for large groups. Warn the participants before sending them into groups. 


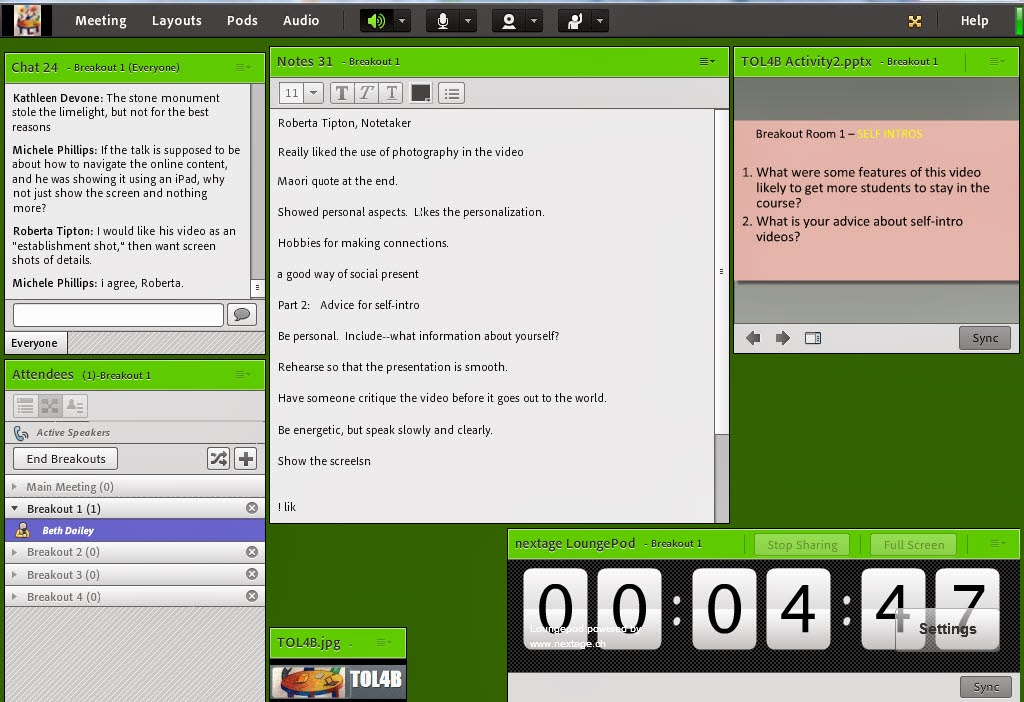
Breakout Room Layout  I like creating a separate layout for the breakout room activity that   You will need to use very large font (30 -32, at least) because the pod will be small.)  The chat pod was used to facilitate discussion for those without microphones.  The Note Pod was used for the note taker/reporter to capture the highlights from discussion.  If you include a place for the reporters name at the top it will be quicker during the report to assign mic privileges to the correct person. I am still experimenting with how to get the timer to work.  I think a countdown timer will help the groups manage their time.
matches
what the groups will be doing.  Below is the format we used. In addition to the chat, attendee and note pod, I included a share pod where I uploaded a slide with activity directions and participant roles.


Moving into Breakout Rooms
The first step is to select the breakout view from the Attendees Pod. You will then see the number of breakout rooms.  Three rooms is the default. You can add additional rooms by clicking the  button.
       
The second step is to move people into the rooms. The easiest way to do this is to evenly distribute them from the main room.  To do so press this button

You can also click and drag individuals to different rooms.  This can and should be done prior to starting the breakouts.
Step three.  If you have a specific breakout room layout bring that layout up BEFORE moving into groups.  The groups will experience the layout applied before moving into groups.
Step four. When you are ready to move to breakouts, give a heads up and then press the 
button. The hosts will remain in the main room and can move themselves into various breakout rooms.  It is good to check back in the main room periodically.  If someone comes late to the session, they will enter the main room and you can then move them individually into a room.


Breakout Room Activity You may want to have a back-up reporter and several back-up facilitators just I case.

Ending the Breakout Session You have the ability to send a broadcast message that will be viewed simultaneously by all groups.  It is good practice to give a five minute and 1 minute warning.

Group Report Out When the groups report out you can open their white board while in the main room so they can refer to their written summary.  You will need to give mic privileges to the reporter.  If the reporters names is at the top of the Note pod, this will be faster.
NOTE: If you are sending the participants back to the same breakout groups, simply press the Start Breakouts button.  If you want them in different groups then press the random button.


Some Resources:

Adobe Connect Breakout Rooms

***Adobe Connect Tutorial: Breakout Rooms

Connect Guru: Adobe Connect Pro Breakout Rooms
Using Adobe Connect 9 (pg. 61-70) http://help.adobe.com/en_US/connect/9.0/using/connect_9_help.pdf